While the concept of streaming or how to start streaming has been around since the mid-90s, streaming as we know it - mostly either live streaming with services like Twitch or YouTube or streaming via services like Netflix, are relatively new concepts.
It may, however, come as a surprise to many that both streaming and live streaming have been popular on the internet for more than a decade.
Both Justin.tv, the “original” Twitch, as well as Netflix Video On-demand were started in 2007. Justin.tv acted as a place for individuals to live stream themselves and their friends for any and all of the internet to watch. Before Justin.tv, the concept of live streaming or how to start streaming was one held mostly by large corporations and news organizations. Justin.tv broke this trend by bringing the concept to the masses, allowing anyone with an internet connection to broadcast themselves to an audience.
Over time, Justin.tv grew to be a popular platform for game live streams, seeing more and more focus on that topic about how to start streaming in a modern way versus traditional streams which were more person-oriented. A gaming category was added in 2008 and consistently dominated the site in popularity. In 2011 the category was split off into its own site: Twitch.tv.
In a nutshell, streaming and live streaming are both types of content built around the concept of internet-based data streaming to watch content. The only real difference between Netflix and services like Twitch is that Netflix is pre-recorded and on-demand, whereas live streaming platforms are all live.
Note: This article focuses on starting your streaming journey on Twitch. In case you want to go multi-platform or find software like OBS too complicated, consider supplemental software like VEED. You can multi-stream to Twitch, YouTube or Facebook Live directly from your browser. Simple and clean.
Onto our thorough guide now!
Streaming Today
Today, learning how to start streaming and live streaming are a major part of pop culture. Between Netflix, HBO Go, Hulu, YouTube Red and other online streaming services, the concept of learning how to start Twitch streaming or streaming TV content has gone from a mere concept to the entire entertainment structure of a generation in just over a decade. On the gaming side of things, Twitch.tv and YouTube Gaming — to a lesser extent — dominate the market on live streaming games. Learning how to start streaming or live streaming has gone from a niche hobby to an entire industry. Many people are making a living off of live streaming professionally, securing partnerships and sponsorship deals, selling merchandise and even creating content on YouTube. On the other side, e-sports has grown from an industry nearly exclusive to South Korea, to a worldwide phenomenon in only a handful of years. Billions of hours of e-sports are watched each year, more and more games see the big stage, and careers are born every day.
In just over a decade, our entire culture has shifted from traditional cable/satellite television and couch gaming to on-demand content and live entertainment for and by everyone.
How To Start Twitch Streaming
Creating Your Account on Twitch
First things first in Twitch streaming setup: you'll want to register for an account. Since we’ll be using Twitch, you’ll want to create an account on Twitch.tv. As with most sites, this primary process in Twitch streaming setup is simple and should be more than easy enough for anyone to do.
- Navigate to http://www.twitch.tv/
- Click the “Sign Up” button at the top-right of the page.
- Fill in your Username, Password, Birthday and Email.
- Verify yourself as Not A Robot using the Captcha.
- Click “Sign Up” at the bottom of the box.
- Verify your Email with the link sent to the Email you specified.
After doing the above, your account will be set up!
Simply registering won’t be enough down the road, so in this Twitch streaming guide we’ll cover some basics of account configuration. Navigate to the top-right of the page and hover your mouse over your username. Clicking on it will bring up a drop-down menu where you can select a handful of options. We’ll start with Settings.
Twitch Settings
Setting Up Your Software (OBS Studio)
While there are many options for software when it comes to streaming, the most widely used and accessible of them is easily Open Broadcast Software — or OBS. It’s open-source, free and easy to use. Today, we’ll be covering the basics of how to use it and how to set up your stream. We’ll cover the main interface and all the settings you’ll want to check for you to learn how to start streaming on Twitch. Let’s get started with this Twitch streaming guide!
Firstly, you’ll want to make sure you download and install OBS, so make sure you do that. You can download it from here. Once it’s installed, you’ll be greeted with an interface that looks something like this:
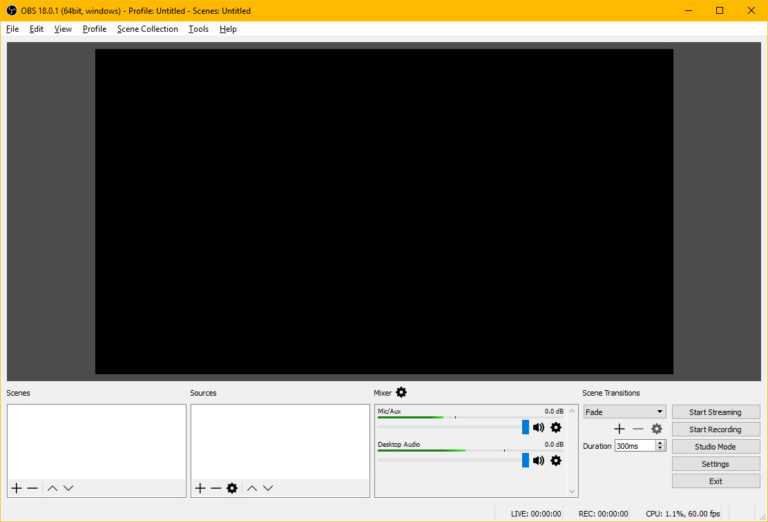
From here, we can see a few things. Firstly, we have the Scene and Source panels. The Scene panel is where everything will be displayed, and the Source panel is where all of your elements will be held. “Source” may be titled “Game Capture” but Source will contain the game, an overlay, a camera or anything else you wish to broadcast. To the right of these panels are your general mixing controls. We’ll go over these in more detail later, but for now let's continue this part of the Twitch streaming setup.
To the right of these panels are your general mixing controls. We’ll go over these in a more detailed part of this Twitch streaming guide later, but for now, we can use these two as a reference. The Mic slider is used to configure how loud your mic input volume is, and the Desktop Audio slider is used to turn up or down your audio output — that is, everything coming through your speakers or headphones.
To the right of these sliders is the Scene Transition setting. This is used only when you intend to switch sources. OBS can either fade or cut, depend on what you prefer. You can also set the duration of the transition and configure its options.
To the right of that, we have the Start Streaming, Start Recording, Studio Mode, Settings and Exit options. These do basically what they sound like they do. Start Streaming will begin broadcasting, Start Recording will start a local capture, Studio Mode enables more control over transitions, Settings allows you to configure OBS, and Exit will close the program.
Setting up your Scenes and your Sources will take some time, practice and patience and it’s entirely up to you how you wish to configure it. For the sake of demonstration, we’ll set up a basic desktop capture.
First, right-click inside of your Scene area and click “Add.” You’ll be prompted to name your Scene, so go ahead and do that. Once it’s created, right-click inside of Sources, mouse over Add, and click “Display Capture.” From here, you’ll want to name the Display capture. I will be naming mine Desktop. Once you’ve done this, you’ll be greeted with a video preview and a menu. From this menu, you’ll want to select whichever monitor you intend to stream. After you do, you can add it to your Scene and it should appear as a capture of your display. This means that OBS will stream anything that happens on the specified monitor.
The process is very similar for capturing a game. However, you’ll need to have the game running in order to specify to OBS which game you intend to stream. You can also capture a Capture Card, Webcam, a specific Window or more.
Next to do in this Twitch streaming setup or Twitch streaming guide, we’ll add a basic overlay. Right-click inside of Sources once again, and instead of Display Capture, click on Image. Name your image and continue. You’ll then be prompted to specify a path to the image. Once you do, you can apply the image to your stream. Similar to photo editing or video editing software, OBS uses layers for sources. The top-layer is going to be on top of all media below it, and this hierarchy works all the way down. Ensure that your specified image is on top of your Display Capture, and you should instantly see it appear. That’s the gist of it!
From here, you’ll be able to explore and experiment with Scenes and Sources inside of OBS to make your stream yours!
Next part of this Twitch streaming guide and Twitch streaming setup, we’ll be going over the Settings of OBS to get your stream set up, so let’s go into Settings!
Settings

Stream
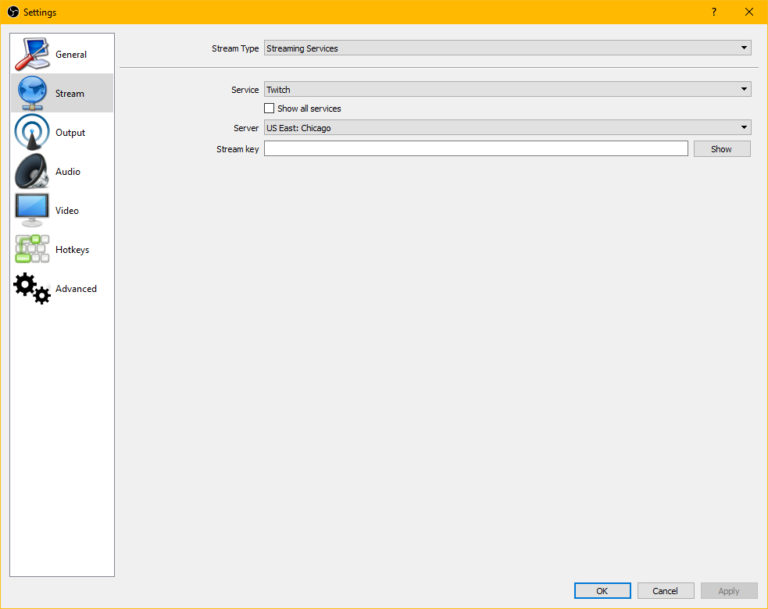
The Stream tab is used to configure your Streaming platform. Here you’ll specify what website and server you wish to broadcast to. If you’re broadcasting to a platform not specified in the Service drop-down menu, you can configure it to whatever server you desire by changing the Stream Type menu from Streaming Services to Custom Streaming Services.
You’ll want to change your server to one that is closest to your location to ensure the best stream quality and experience for both you and your viewers.
Lastly, and this is the most important part of this Twitch streaming setup guide: your stream key. Whether you’re streaming on Twitch, YouTube or any other site, you’ll need to specify a Stream Key so OBS knows where to broadcast to. You don’t actually need to hook into a browser at all for OBS to begin broadcasting. Once you supply your Stream Key, you’ll begin broadcasting to whatever channel the key is tied to.
On Twitch, to retrieve your Stream Key, do the following:
- Navigate to Twitch and log in.
- Click on your name at the top-right of the page and click “Dashboard.”
- From the dashboard, click on the “Settings” tab.
- Click on the “Stream Key” button.
- Click “Show Key” and confirm that you wish to view your key.
- Copy the provided key and paste it into OBS in the Stream Key dialog.
That’s it! Do note that you do not want to share your stream key with anybody, or they will be able to broadcast on your channel at their leisure. You should never share your key while learning how to start streaming on Twitch.
Output
Audio
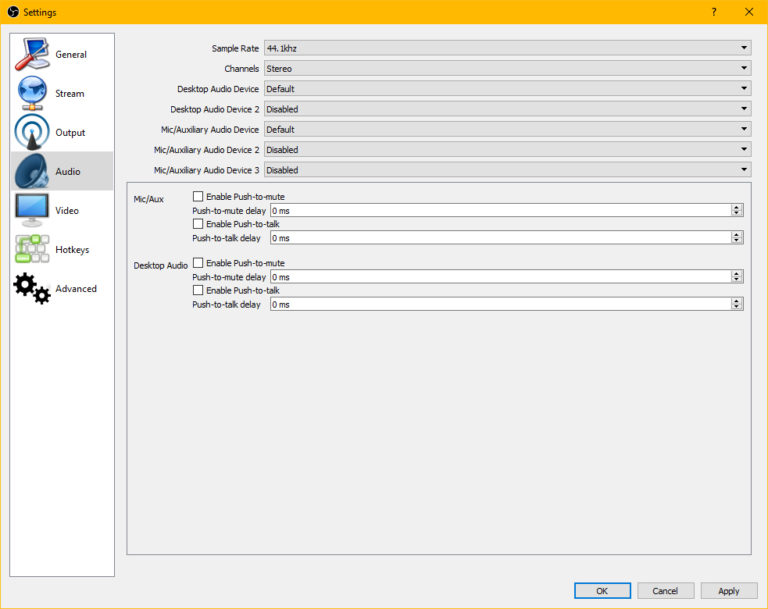
Next to discuss in this Twitch streaming setup guide, we have Audio settings. This tab is fairly straightforward and allows you to specify details regarding your Audio hardware. You can specify which Speaker / Mic to use, whether you want Stereo or Mono audio, your Sample Rate on your audio (typically this setting does not need to be changed) and enable/disable Push-to-Talk or Push-to-Mute. By default, OBS will use whatever devices you have set as Default in Windows, but just in case you want to specify a new device, you can do so from this tab.
Video
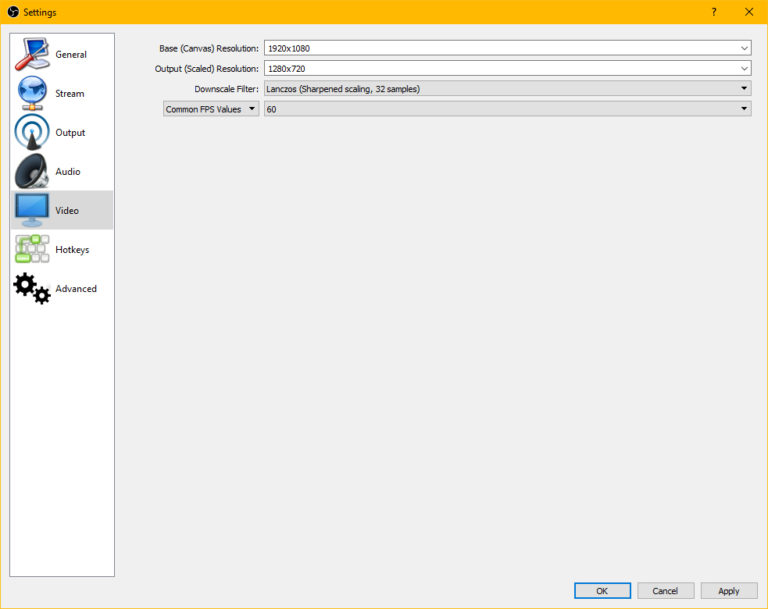
The Video tab is where you’ll be able to configure the resolution and framerate of your stream.
You’ll want to set your Base (Canvas) Resolution to the native resolution of your monitor. By doing so, you’ll have the largest amount of space available to set up for an overlay, camera or any other information you want to put into your stream.
The Output (Scaled) Resolution tab is the most important one, however. This is the resolution that your streaming platform will broadcast your stream at. Generally, streamers have accepted 720p over 1080p, because Twitch has always used a rather low bitrate (3000kbps max) which mean there was too little data available for 1080p streaming. However, with Twitch updating their platform to support bitrates up to 6000kbps, 1080p is now an acceptable resolution and actually looks better than 720p at the same bitrate. The biggest decider here will be what your upload speed is capable of, and what your computer is capable of. If you are able to use a high bitrate of 5000kbps+ and you have a decent computer, use 1920×1080. If you’re using a lower bitrate or have a slower computer, use 1280×720.
The framerate of your stream is going to determine how smooth it is, and how natural it feels. Generally, you’ll want your Twitch framerate to be as high as it can go, but certain cases can be made where a lower framerate is actually better. If you’re only playing a game at 30fps, then a 60fps bitrate won’t help, and may actually look worse in some cases. However, if you’re playing at 60fps+ and your computer is able to handle the higher framerate, definitely set it to 60.
Hotkeys
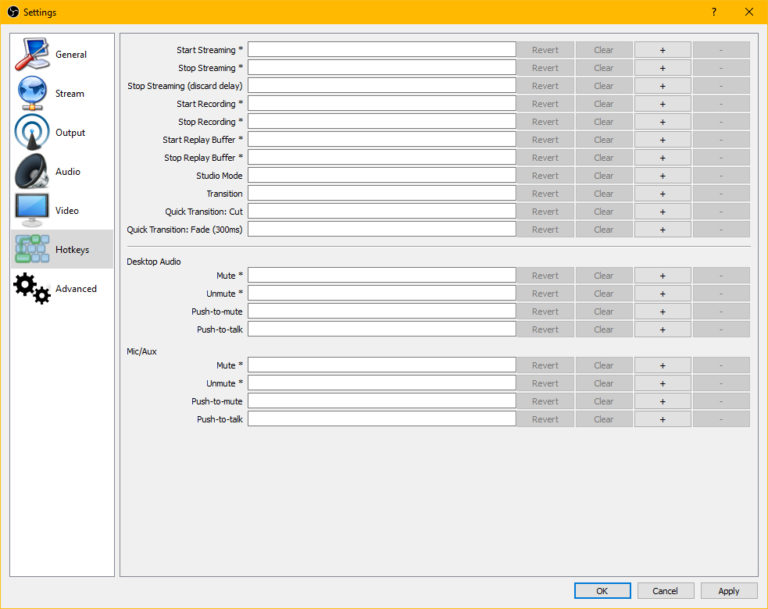
The Hotkeys tab is very straightforward and requires almost zero explanation. From here you’ll be able to specify hotkeys — effectively shortcuts, to certain OBS functionality. Things like stopping and starting a stream/recording, transitioning scenes, muting / unmuting audio and more.
Advanced
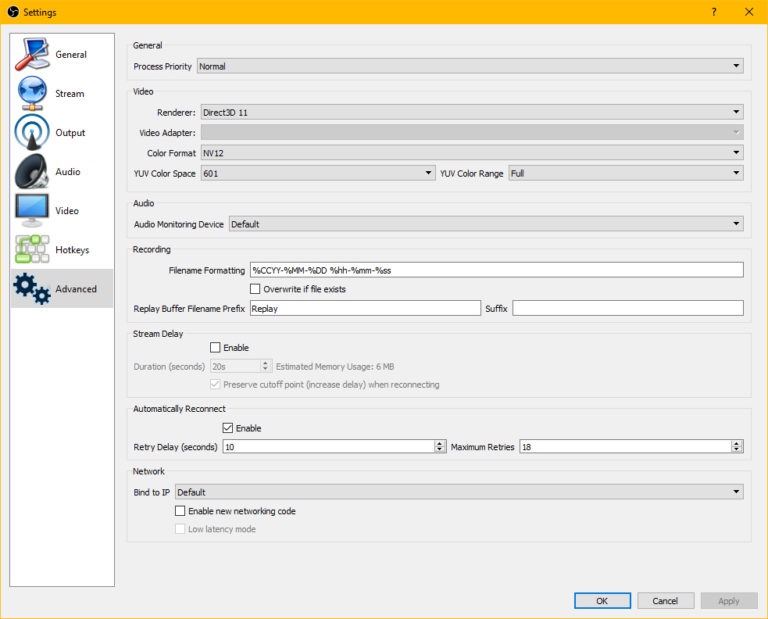
The Advanced tab is one that beginners will want to stay away from, as there are a handful of settings in here that if handled improperly may break your stream. However, I’ll walk you through a handful of these settings just so you know what they are while learning how to start streaming on Twitch.
The Process Priority setting specifies the Priority of the OBS process in Windows. A higher priority process will cause Windows to devote CPU resources more specifically to the application, but it will cause other programs to become unstable. In almost all cases, it is fine to leave this setting at Normal.
The Video settings area allows you to manage what Renderer, Color Format, Color Space and Video Adapter you wish to use while streaming. In a majority of cases, it is fine to leave these all at default, but video editing professionals may find these settings useful for ensuring that their colors are proper and that nothing looks distorted or wrong. Changing these settings improperly could cause video or color artifacts, however, so be careful with this part while learning how to start streaming on Twitch.
Setting an Audio Monitoring Device is used to specify an Audio device that will play back all streaming audio, allowing you to listen and ensure that your desktop and microphone audio is balanced properly. This setting is typically only useful if you have a separate pair of headphones you can hand to someone else in-house.
The Recording tab is used only to help configure local recordings. You can specify a file output name and a prefix/suffix for each file. This setting is mostly harmless, so long as you do not introduce conflicts with improper naming schemes.
As mentioned earlier in this Twitch streaming guide, you can enable/disable a Stream Delay option through OBS itself, and that setting can be found here as well. The setting is relatively straightforward.
The Automatically Reconnect setting is used to allow OBS to reconnect to your streaming platform if a disconnect occurs. This setting is best left to Default, to ensure that your stream continued unhindered after a connection interruption.
Lastly, the Network tab is used to specify which IP / network adapter OBS should use for its connection. In almost all cases, leaving this on Default will be fine. It’s safer to say that if you know what this is, you know what it does. If you don’t know what this is or what it does, you don’t need to change it. This is the safest way to go in learning how to start streaming on Twitch.
That’s about it for Twitch streaming setup and configuration inside of OBS! All that’s left now is going live! Keep reading to know how to start streaming on Twitch, live!
Going Live
Before clicking that “Start Streaming” button, you’ll want to configure your stream on Twitch with the help of this Twitch streaming guide and Twitch streaming setup. This is very easy.
Navigate back over to your dashboard on Twitch, and we’ll start configuring and learning how to start streaming on Twitch!
Now that you’re at your dashboard, you’ll be able to change most of your stream settings. You can title your broadcast from the Title field, set your Broadcast Language, specify your game you intend to play, and even represent a Community. You can also preview your live broadcast from here and monitor its chat.
Make sure to specify what game you’re playing or what activity you’re doing. Twitch has a specification for almost every game, and you can even specify if you’re being creative or streaming “In Real life”.
You’ll want to ensure you specify what you’re playing or streaming, as broadcasting an activity or game that you are not participating in can often lead to suspensions or warnings from Twitch staff.
Next with this Twitch streaming setup guide, we’ll configure your actual stream page. Return to the drop-down menu where the Dashboard option was, but this time you’ll click Channel.
From this page, you’ll want to click the Edit button at the top-right, directly above the giant stream window. From here, you’ll be able to set a banner and avatar for your stream.
Scrolling down, the Edit button underneath your stream will function the same as the Title, Language and Playing options from the Dashboard.
Beneath your stream, you’ll see an “Edit Panels” slider option. Enabling this will allow you to add Image Panels and text to the area below your stream. These should be recognizable to anyone active on Twitch, either as a streamer or a viewer. You’ll be able to configure each individual panel here, but do note that you’ll need to provide your own images. Images can be hyperlinked to other websites such as social media, but you’ll want to ensure you stay within Twitch’s guidelines for this.
That’s it! Now that your stream is configured, it’s time to go live! And now, let's move to the next part of this Twitch streaming setup and Twitch streaming guide.
Improving Your Stream
There are a handful of ways for you to learn how to how to start streaming and improve your stream and make it stand out. With streaming being so accessible and popular, anyone with a computer and decent internet connection can be the next big hit, so if you want to ensure you stand out from the crowd, be sure to improve your stream and follow everything you can learn from this Twitch streaming guide! To make it easier, we’ll go over a few ways to do so.
Microphones
Arguably the most important part of your stream, having a good microphone for clear communication is a key aspect of impressing your audience. Nobody wants to watch someone they cannot listen to, and nobody wants to listen to someone that sounds as if they’re talking through a walkie-talkie. Luckily, we have an article on the best microphones that would be perfect for any gamer or streamer, so check that out.
Headphones
Next important thing to know while learning how to start streaming, a good streamer should always invest in a decent pair of headphones. You don’t want to broadcast your game audio through your microphone, as this can often lead to feedback loops on your stream and nobody wants to listen to that. Furthermore, a nice pair of headphones can also improve your gaming capabilities, as you’ll be able to hear subtle nuances in the audio of your game. If you already own a headset, that should suffice. However, if you’re interested in taking things a step further in learning how to start Twitch streaming, consider checking out our guide on the best headphones for gaming and streaming.
Face cams
While learning how to start streaming, adding some personality to your stream can go a long way, and many people accomplish this through the use of a facecam — otherwise known as a webcam. These are cameras used specifically to broadcast yourself alongside the game. While not necessary, many streamers use this to add a layer of personality to their stream, allowing viewers to see their reactions in real-time. This also enables the streamer to do more creative streams if they so desire. Be sure to check our guide on vlogging cameras.
Mixing Your Audio
This one’s very important in the process of learning how to start streaming and should be taken into consideration while reading this Twitch streaming setup and Twitch streaming guide. Nobody wants to watch a stream where the game is so loud you cannot hear the streamer. Inversely, nobody wants to watch a stream where all you can hear is the streamer and not the game. The process of mixing audio is going to require patience and a keen ear, but having a friend help you out can go a long way. This is also where the Audio Monitoring option will come in handy inside of OBS. Make sure that your voice stands out from the game, but also that the game can still be heard clearly whether or not you’re speaking.
Overlays
This one’s a very polarizing suggestion. While learning how to start streaming, you should know that half of the streaming community will protest that overlays are distracting and take away from the experience. The other half will argue that overlays introduce personality and flair to a stream. Depending on which side you’re on, this is something you’ll want to look into while learning how to start streaming. Whether you theme your overlay to match your game, your personality or your overall aesthetic, there are many options. Overlays aren’t just reserved for those with graphics design degrees either, as there are many sites which will sell you overlays for relatively cheap.
General Tips
Below, I’ll provide you with some more general Twitch streaming guide and Twitch streaming setup tips to ensure that your stream does the best that it can. These won’t be very specific, but they can be beneficial in ensuring your stream is as good as it can be and.
- No matter how often you can stream, always stream on a schedule. Consistency in streaming will result in more consistent viewers returning to future broadcasts.
- Ensure that your stream is configured to best suit your internet capabilities. A non-HD stream is always better than an HD stream that buffers a lot.
- Interact with your audience. Be sure to pay attention to the chat. Answer questions, ask questions and get to know the Kappa Community.
- Do not overcomplicate your overlay/panels. Make your layout easy to read and follow. You don’t want your viewers getting lost in a barrage of information.
- Integrate social media into your streams. Don’t be afraid to announce on your Twitter when you’re going live. Not everybody will see when you go live, so letting them know ahead of time and through a different platform can be very mutually beneficial.
- Minimize dead air or downtime. Try to always communicate and talk, and refrain from taking extended leaves from the stream unless absolutely necessary. There’s nothing worse than hopping onto a stream that says “Be back soon!”
While these Twitch streaming setup and Twitch streaming guide tips are very general, they should help you to establish a good foundation for you to build an audience and following, and to ensure you don’t develop poor habits. Remember that live streaming is 80% personality, and 20% actually playing!
Now that we’ve reached the end of this Twitch streaming setup and Twitch streaming guide, I hope I’ve provided you with enough information and tools to get yourself well on your way. Making a name for yourself isn’t easy, but with enough time, passion, dedication and motivation, it can happen.
Don’t give up! We hope this Twitch streaming guide will be a lot of help for you.
Conclusion
Learning how to start streaming or game streaming can be a casual affair or a profitable one. In both cases, you need to have a reliable streaming PC and a fast and stable internet connection. For casual streamers, a webcam for streaming and a discrete microphone are not necessary. However, they are absolute musts if you’re going to make money out of it. When it comes to learning how to start Twitch streaming and using the streaming software, both OBS and Xplit Broadcaster are popular choices. If you want a simpler one (as discussed earlier in this Twitch streaming setup and Twitch streaming guide), you can opt for the Xplit Gamecaster, although, the Broadcaster has a lot more options.
Remember, if you’re going to stream or learn how to start streaming, you always have to engage with your audience. That is why this Twitch streaming setup and Twitch streaming guide suggest that having a dedicated microphone can do wonders as your voice will become much clearer to them. Also, try to chat with them from time to time, mix things up, make your content enjoyable and/or informative. Put your own personal brand. Make your channel unique by expressing who you are, your personality, and your own take on the games you play and stream. Create a schedule and commit to it so that people will know when you’re going to go online. Communicate with your audience like they were there with you. Never be too dull and boring, otherwise, you will lose a huge chunk of your viewership. Disseminate links to your channel on your social media accounts. Tell your friends and family about it so that they can also tune in and even invite some more people too. In the early stage of learning how to start streaming, don’t be discouraged if your channel doesn’t have a lot of viewers yet. Some popular streamers didn’t start out famous but they were committed to doing whatever it takes until they got where they are now. So, venture forth brave streamer. Follow the things that I’ve said in this Twitch streaming setup and Twitch streaming guide and I am sure that your how to start Twitch streaming adventure will be a fruitful one.
- Big and Tall Gaming Chairs – Ultimate Buyer’s Guide - December 8, 2022
- How Many Fans Do I Need for My Gaming PC - October 6, 2021
- How Many Amps Does a Gaming PC Use: Accurate Explanation - October 5, 2021
